
Domande frequenti
Le risposte alle domande che riceviamo più spesso. Non trovi la tua? Scrivici.
HUNTERRA è un'app mobile per cacciatori (iOS e Android) per gestire una riserva, condividere la posizione durante la caccia, registrare gli abbattimenti e associare collari GPS. Questa pagina raccoglie le 41 domande più frequenti con le risposte degli autori dell'app, ordinate in 9 argomenti.
Le risposte sono per ora in inglese.
Quale problema vuoi risolvere?
Account, accesso e batteria
Am I obliged to register?
You can use the Hunterra application without registration. But if you want to create a new Hunting gound or Event or to become a member of it, you must register.
Registration is easy. Just enter your email address, name, surname, set your password and confirm the Terms of Use. Then just click on the “Create Account” button and your registration is successfully completed. You will receive an email confirming your registration to the email address.
The application extensively consumes my battery. What should I do?
The increased power consumption is caused by the Hunterra app usage of location services (GPS), data sharing functions (working with points of interest, reservations, location sharing and downloading maps), and you probably use your Hunterra app with the display switched on within cold weather conditions. To reduce the consumption, it is possible either to use the phone less :), to optimize the data transfers (for example, by downloading background maps for offline use) or to use a power bank. During driven hunts, the use of a power bank is highly recommended.
Riserva e membri
How to join a Hunting ground?
You can join the Hunting ground using a unique 6-digit numeric code, which the Owner or Home hunter shares with you.
In the section “Grounds” click on the “+” button. The “New Gound” screen will open. Enter the unique code in the “Connect by Code” box. After entering the code, click the “Join” button and the application will redirect you to the Hunting ground. You are now a Member of this Hunting ground. This Hunting ground will also appear in your “Shared Grounds” list.
Can I change the borders of Hunting ground?
The public authorities sources, where available, are used for automatic Hunting ground borders creation (e. g. ÚHUL for CZ or NLC for SK). However, they can vary from the reality.
The boundaries of the Hunting ground can be changed on the Hunterra website app.hunterra.eu. Just open the Hunterra website directly in your mobile browser by clicking on the “Edit Ground boundaries” button (part of the editing functions in Hunting ground details in mobile application).
In the web application, open the Ground you want to edit. Click on the “Manage Ground – Change ground map” button – the Huntin ground map will be displayed. To turn on the editing of Hunting ground boundaries, click on the “Edit outline” button in the toolbar. You can now adjust the boundaries of your Hunting ground. After editing the boundaries, do not forget to click on the “Save boundaries” button.
What user rights do particular roles have?
there are various user roles within Hunterra. There has to be at least one Owner of each Hunting ground.
Owner – The owner is allowed to modify the entire Hunting ground. He can edit/delete any point of interest and boundaries. He can also manipulate with the ground members, including changing their permissions. He has the rights to invite users using a code, as well as to reset the code. The Owner is the only role having the right to delete the entire Hunting area. More members can be promote to this role
Home member – The home member can edit/delete own points of interest, as well as points of interest created by other members. He has the option to change the name of the Hunting ground. He has also the right to promote members to a Home member, demote them to Members or to remove them completely from the Hunting ground. He also has the rights to invite new users to the Hunting ground, but does not have the right to reset the invitation code or delete the entire Hunting ground.
Member – The Member can only edit his own points of interest and is not authorized to edit or manage other members.
Can there be 2 or more identical Hunting grounds?
Each Hunting ground is unique. Even if you create two or more Hunting grounds with identical boundaries (e. g. by importing them from ÚHUL or NLC), they are still different Hunting grounds, with own POIs, own members as well as own invite codes.
Can I filter just particular POIs in the Hunting ground?
Yes, simply select the overlays and filter options (eye symbol in the right part of the map) and choose which POIs you want to see:
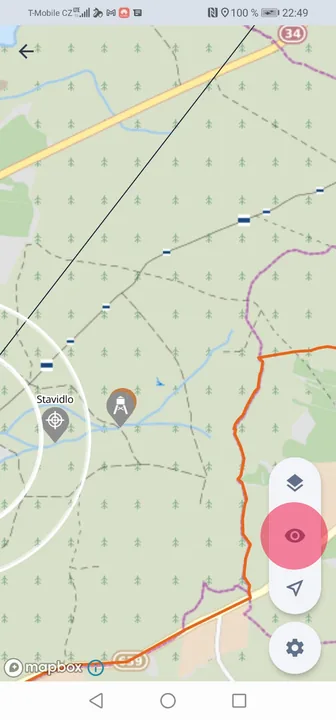
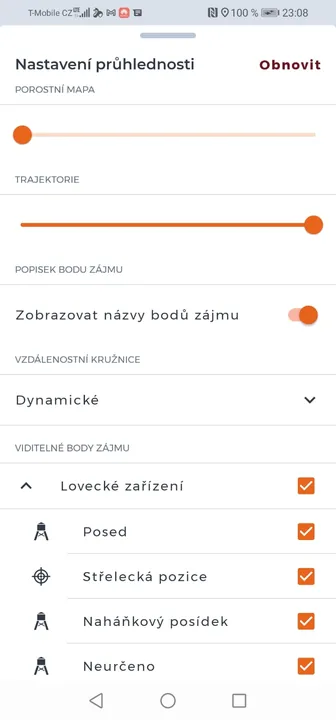
How to prevent removed users from returning to the Hunting ground?
Simply change the access code in the Hunting ground settings:
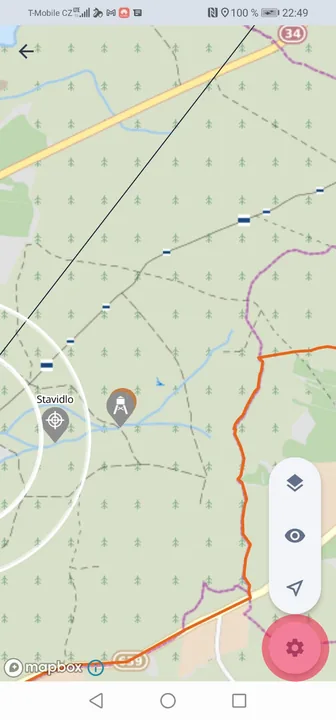
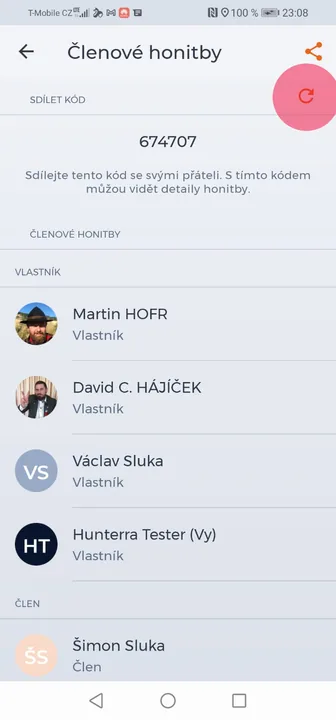
Mappa, offline e punti di interesse
How to book a high seat?
The High seat and similar POIs can be booked by opening the details of the POI and clicking the “Book” button. The POI reservation card appears. Choose starting and ending date and time of your desired reservation. And press the “Book” button – your reservation will be registered.
On the reservation card, you can see your reservations, as well as the reservations of other users there. Reservations cannot overlap and there can be only one reservation at a time.
Can I use maps without the Internet connection?
Yes, the base map can be downloaded for offline use. In the offline mode, the downloaded maps and all saved POIs are displayed even if the Internet connection is not available.
You can download the base map by clicking on the “Download” icon in the “Map settings” section. In a similar way, you can also delete a base map from the offline storage. The size of saved maps (that is, the size of the area downloaded for offline) is limited by used technology. Therefore, if you can’t download more maps, or get an error message when downloading them, you may need to delete some of the previous offline maps. This will free the space on your device and allow you to complete the download.
Can I add points of interest even when I'm offline?
Yes, if you lose your Internet connection, you can still add points of interest. Once you are connected to the Internet again, the points you have created will be saved and displayed to other users.
The whole map of Hunting ground or Event is updated after re-establishment of the Internet connection and you are shown the latest information and changes.
In offline mode, points of interest can only be created, they cannot be edited or deleted.
Can I add my own base maps?
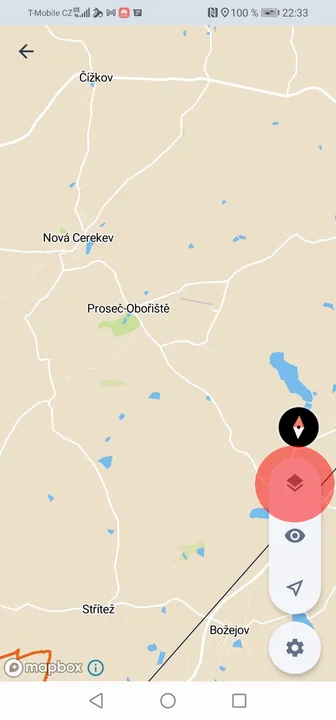
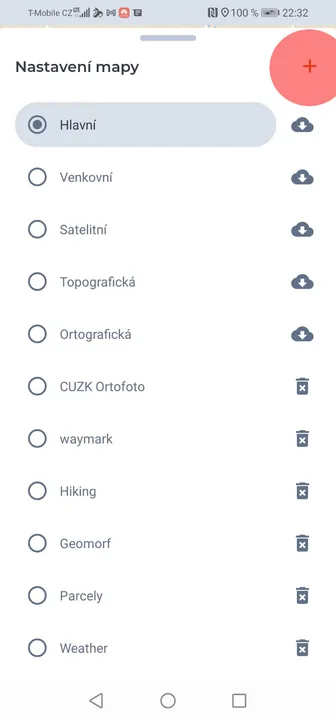
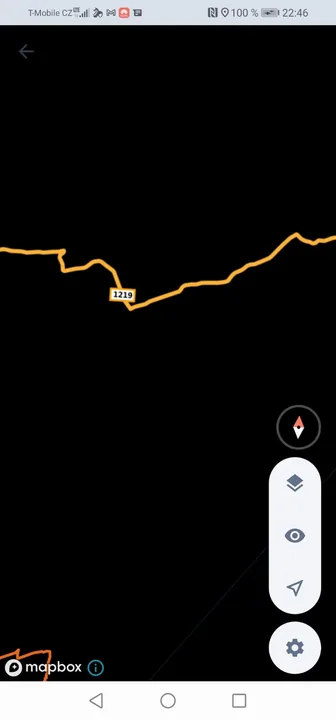
The Hunterra app uses a map framework that allows you to add your own map data. WMS and TileJSON sources are supported. Custom maps can be added, but not in basic user mode. We are working hard to introduce the expert mode soon.
How do I add my own WMS base map?
You need to have the advanced features of the application active for this option. Then follow the instructions below:
1. Select the map you want to add and open the service description (available from your service provider).
2. Make sure that the map you want to add to the application is available online in WMS format (in the description of the service – eg. “http://ags.cuzk.cz/arcgis/services/GeomorphologickeJednotky/MapServer/WmsServer?” it must be stated that the “WMS” resource is available).
3. In the XML specification of the WMS source metadata (usually displayed after selecting the WMS link; hereinafter referred to as the “specification”, eg. “https://ags.cuzk.cz/arcgis/rest/services/GeomorphologickeJednotky/MapServer/WMS/1.0. 0/WMSCapabilities.xml”) search for the value xlink: href in the section <OnlineResource>, or <Capability> <Request> (eg. “http://ags.cuzk.cz/arcgis/services/GeomorphologickeJednotky/MapServer/WmsServer?” hereinafter referred to as “URL”).
4. Find the section <GetMap> in the specification and select the correct format – keyword in this section <Format> (for example “image/png”), then add to the URL the corresponding text (eg. “request=GetMap&service=WMS&version=1.3.0&format=image/png“, where the version must match the specification (in the WMS service specification, find the section under the keyword <Version=”).
5. Then search in the service description (not in the XML metadata specification) for information about the size of map tiles (keywords “Tile Info:”, “Height:”, “Width:”) and add to the URL the corresponding value (eg. “&height=256&width=256“). Attention! The Hunterra application allows you to work only with square tiles!
6. Search in the specification for the section with available projections – subsection <CRS> – and make sure that the service supports the projection PseudoMercator – WGS 84 (EPSG code: 3857). Also make sure that the metadata for the selected projection contains a definition of a geographical indication – subsection <BoundingBox> with the value CRS = “EPSG: 3857”. Then add the appropriate values to the URL (“&bbox={bbox-epsg-3857}” and eg. “&crs=EPSG:3857“).
7. In the specification, find the layer you want to display – section <Layer> – and select the corresponding ID (in the subsection <Name>), add the value specified in the section <Name> to the URL (eg “&layers=0“).
8. In the specification, find the available styles (section <Style>) and select from the available styles; add the value specified in the <Name> subsection to the URL (eg “&styles=default“).
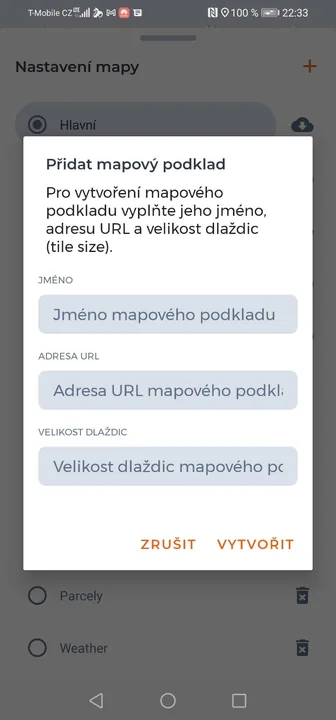
9. In the Hunterra application, add a base map, fill in its name in the “Name” field (for example “Geomorphological units”) and enter the URL created according to the instructions above in the “URL” field in the Hunterra application (eg “http://ags.cuzk.cz/arcgis/services/GeomorfologickeJednotky/MapServer/WmsServer?request=GetMap&service=WMS&version=1.3.0&format=image/png&height=256&width=256&bbox={bbox-epsg-3857}&crs=EPSG:3857&layers=0&styles=default“
10. Make sure to enter the correct value from step 5 (eg “256”) in the “Tile Size” field.
How do I add my own TileJSON base map?
You need to have the advanced features of the application enabled for this option. Then follow the instructions below:
1. Select the map you want to add and find the URL (eg. Waymarkedtrails Cycling routes for a map with cycling routes).
2. In the Hunterra application, add a base map, fill in its name in the “Name” field (for example, “Tourist”) and enter the found URL in the “URL” field in Hunterra (for example, “https://tile.waymarkedtrails.org/cycling/{z}/{x}/{y}.png“).
3. Make sure to enter the correct value of the tile size supported by the resource (eg. “256”) in the “Tile size” field.
Quali punti di interesse posso aggiungere?
L'app offre 38 tipi di punto predefiniti in 5 gruppi: strutture di alimentazione (punto di foraggiamento, rastrelliera per fieno, tramoggia, mangiatoia automatica, salina, abbeveratoio, linea di foraggiamento, esca, magazzino del mangime), segni di presenza (fototrappola, insoglio, tana, tana artificiale, passaggio di selvaggina, area di riposo, zona degli amori e di nidificazione), organizzazione (casa di caccia, punto di ritrovo, parcheggio, ponte, guado, sbarra, conduttore di cani, veterinario, pilota e operatore di drone, volontario), postazioni di caccia (altana, postazione a scala, postazione per battuta, posta di tiro, trappola) e una freccia direzionale. In più potete disegnare 8 tipi di area: sezione, gruppo di gestione, coltura a perdere, area di brucatura, zona pericolosa, zona vietata, zona solo per proprietari e battuta. Li trovate tutti nella pagina Punti di interesse. Alle aree è dedicata una pagina a sé.
Condivisione della posizione
We can not see each others although we share the positions. What’s wrong?
To share your locations, all users must have this feature turned on. Subsequently, only users who are members of the relevant hunting ground are “seen” by others and only if they are physically present in the Hunting ground. A few hundred meters after leaving the Hunting ground, the tracking features are turned off automatically to ensure that users’ privacy is not compromised. However, we still recommend to turn off the sharing option when you leave your Hunting ground.
How do I turn on the location sharing within the Hunting ground or Event?
In the Hunting ground, your location sharing can be turned on or off using the “Door” button. The application will always notify you if you are sharing your location (by the color of the button).
Within an Event, you can also manually turn location sharing on or off until the Event has not started yet. As soon as the Organizer starts the Event (changes the status of the Event to “Event started”), the Hunterra application automatically start sharing your location with other participants. For the security reasons, you can’t stop sharing your location until the Events is stopped. Once the Event is over, you can stop sharing your location again.
The location sharing button disappears. What’s wrong?
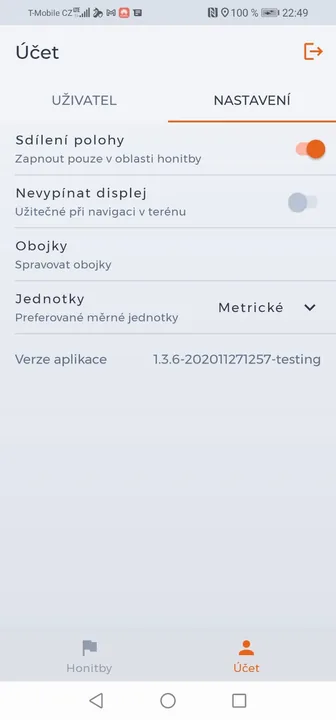
In previous versions, there has been the location sharing button placed on the main screen (map), now you can find this option in the settings options.
The Hunting ground map is full of lines. How to remove them?
The trajectories are recorded automatically, when sharing locations within the Hunting ground. They disappear after 24 hours. If you do not want to display them, simply select 100% transparency of trajectories in the overlays and filter settings (eye symbol in the right part of the map). You can also delete inactive trajectories manually (depending on your user role).
Can I remove trajectories from the map?
Yes, you can delete inactive trajectories only – that means, trajectories displayed after a user has stopped sharing location. After clicking on the trajectory its info card appears. There are information about the “creator” and the time of creation there. Now just click on the delete button and the trajectory will be removed permanently.
Note, however, that each user role has different rights. You can always delete your own inactive trajectory. The Owner role can then delete any inactive trajectory. A Home member may only delete his own trajectory or the trajectory of another Member. And the Member role can only delete its own trajectory.
In addition, all inactive trajectories will disappear from the Hunting ground map 24 hours after the its’ creation.
From the Events map, inactive trajectories are not deleted automatically, but instead are saved in the Events history. So they can only be deleted manually.
Eventi e battute
Can I create an Event for individual hunt, or just for driven hunts?
Any Event can be created as an individual or driven hunt. The number of participants can be limited in the event settings.
When I create an Event as public, can other Hunterra users see it?
All Hunterra users can see the public event and they also have the opportunity to request to join them. It is up to the discretion of an organizer if he confirms user requests.
When selecting a Hunting ground during the Event creation, there is an option to change the map. Will these changes also affect the Hunting ground?
The map changes made during an Event creation (or its’ subsequent editing) will only affect the Event map displayed to the Event participants. It does not affect the original Hunting ground map in any way. For driven hunts, we recommend changing the map in the web application – app.hunterra.eu – it’s a more convenient way and it is possible to change also the boundaries or create particular zones. For the purposes of Events organization, we recommend to create a separate Hunting ground map (in the list of Hunting grounds), where you can prepare the map just for the driven hunts (all the details you want to display to the participants). This avoids the need to make changes to the map repeatedly (especially if you plan to follow the driven hunts conventions multiple times).
Can I create an Event, where no hunting will be performed (such as a hunting party)?
Yes, just state this fact in the description, you will leave the list of hunted game empty. When selecting a Hunting ground, you will only need to select a location of the Event (for this purpose you can create an empty area with one point of interest – the meeting point).
How do I join a private Event?
You can join a private Event using a unique 6-digit numeric code shared with you by the Event Organizer.
If you know this code, you can join the Event. In the main “Events” section, click the “+” button. The “New Event” screen will appear. On this screen, enter the unique Event code in the “Connect by code” field. After entering the code, click on the “Join” button and the Hunterra app will redirect you directly to the appropriate Event.
You are now participating in the Event, your role is “Hunter” by default. This Event will also appear in your “Participating” list.
How do I join a public Event?
Navigate to the detail of the public Event you want to attend and click on the “Join” button. This is how you send a request for participation to the Organizer. This event will then be moved to the “Awaiting Approval” section. The organizer is notified about your request, once he approves you as a participant, you are notified by e-mail and the appropriate Event will appear in the “Participating” section.
You are now participating in the Event, your role is “Hunter” by default.
If the Organizer rejects your request, the Event will be moved back to the “Public Events” list and you are notified by e-mail.
When will the Event be moved to the “History” section?
As soon as the Organizer closes or cancels the Event (sets the status for the Event), the Event will be moved to the “History” section. All added points of interest and created trajectories remain saved and can be used to recapitulate the hunt.
Collari GPS e cani
How do I pair my pet GPS collar with Hunterra?
In order to track a dog’s location on a map, you must pair the GPS collar with the Hunterra mobile app. Currently, the Hunterra application supports the Garmin devices (Astro 320 and higher, which can share information about dogs) and Dogtrace devices (equipped with BLE technology).
How do I pair my Garmin GPS collar with the Hunterra app via DOGGLE?
Launch the Hunterra mobile application, navigate to the “Account – Settings” section, click on the “Collars” button and the “Collars” pairing screen will appear. Click on the “Pair new device” button or the “+” symbol here. You will see a list of available devices on the “Pair New Device” screen. Select a specific ANT+ device from the list of available devices and confirm the connection. To complete the pairing, the application may prompt you to enter the PIN code of the device. The PIN code is delivered with your Doggle device. After successful pairing, you are redirected to the main “Collars” screen, where you can verify that the Gramin device appears in the “Paired Devices” list.
How do I pair my Garmin GPS collar with the Hunterra app via Fenix watches?
To pair your Garmin Fenix watch with the app, you must have the Hunterra app for the Garmin Fenix watch installed. You can download the Hunterra app directly from the Garmin IQ store: https://apps.garmin.com/en-US/apps/b11d9e10-581a-47d0-95d2-cdd72fb819b6. Alternatively, you can install Dog Tracker Plus – more advanced piece of software: https://apps.garmin.com/en-US/apps/3cc2e8cc-69c3-4595-9b04-d2a4864ac194. In that case ensure, you enabled the Hunterra support in the settings (go to main settings by pressing left-middle button on your watches, find “Settings” and ensure “Hunterra” is “On”).
After installing the Hunterra application to your Fenix watch, all you have to do is to open the application on the watch and the dog’s collar will automatically be paired (your Garmin GPS location handheld has to be switched on an has to display at least one dog position). You can verify this by seeing the dog’s name on the watch and its’ distance from your location.
Only after this step you can pair the watch with your smartphone. To pair it, you need to have the Garmin Connect Mobile application (available on https://connect.garmin.com/) installed.
If you have your watch paired with a smartphone via the Garmin Connect application, in the Hunterra mobile application navigate to the “Account – Settings” section, click on the “Collars” button and the “Collars” pairing screen will open. Click on the “Pair new device” button or the “+” symbol. You see a list of available devices and watches on the “Pair New Device” screen. Select your Garmin watch from the list of available watches. To complete the pairing, the application may prompt you to enter the PIN displayed on the Garmin watch.
After successful pairing, you are redirected to the main “Collars” screen, where you can verify that your Garmin watch is really connected and displayed in the “Paired Devices” list.
How do I pair my Dogtrace GPS collar with the Hunterra app?
The Dogtrace device communicates directly via Bluetooth with the Hunterra mobile application. Therefore, no external converter is required.
In the Hunterra mobile application, navigate to the “Account – Settings” section, click on the “Collars” button and the “Collars” pairing screen will appear. Click on the “Pair new device” button or the “+” symbol. You will see a list of available devices on the “Pair New Device” screen. Select a specific Dogtrace device from the list of available devices and confirm the connection. To complete the pairing, the application may prompt you to enter the PIN code of a specific device. The PIN code is delivered with your Dogtrace device.
After successful pairing, you are redirected to the main “Collars” screen, where you can verify that the Dogtrace device is connected and displayed in the “Paired devices” list.
My dog's position does not appear on the Hunting ground / Events map, even if it’s paired with the Hunterra app.
This problem is usually caused by an improper sync with the 3rd party device. In the Hunterra app, stop the sharing of your location and restart the entire Hunterra app – shut down the app completely (even from the background), then relaunch it. Make sure your GPS collar is still paired. Enter Hunting ground / Events and turn on location sharing again. After this step, you should see the location of your dog on the Hunting ground / Events map.
Con quali marche di collare funziona l'app?
Oggi si accoppiano Garmin, Dogtrace e NUM'Axes e l'elenco continua a crescere. Garmin passa da un orologio e dall'app gratuita HUNTERRA o Tracker+ di Connect IQ; Dogtrace e NUM'Axes si accoppiano via Bluetooth direttamente dall'app. Altro nella pagina Collari GPS.
Quanti cani posso avere nell'app?
Il numero non è limitato. Dopo aver accoppiato un palmare si sceglie quali dei cani memorizzati mostrare in HUNTERRA. Altro nella pagina Collari GPS.
Gli altri membri della riserva vedono i dettagli del mio cane?
No. Stato, velocità, distanza e dislivello sono la vista del conduttore; tutti gli altri vedono soltanto il colore e il nome del cane. Altro nella pagina Collari GPS.
Perché dovrei assegnare un colore al mio cane?
In quel colore viene disegnata la traccia del cane per il suo conduttore. Agli altri la stessa traccia appare tratteggiata, alternando il colore del cane e quello del conduttore: a una battuta si capisce subito di chi è. Altro nella pagina Collari GPS.
Perché il responsabile della riserva non vede il mio cane?
Il cane compare al titolare e al responsabile della riserva solo se il suo conduttore è membro di quella riserva e ha il ruolo di Conduttore di cani. Altro nella pagina Collari GPS.
Abbattimenti e fascette
How do I remove a catch that has a seal recorded?
A catch with a seal can no longer be removed from the records. Think carefully before you save a catch with the selected seal.
How do I remove a seal I added to a catch?
Once a seal is added to a catch, or marked as lost, destroyed or returned, its status can no longer be changed to make it reusable. Before you assign a seal to a catch, double-check that you are saving the correct seal number.
Where do I find the trained person (game meat inspector) agenda?
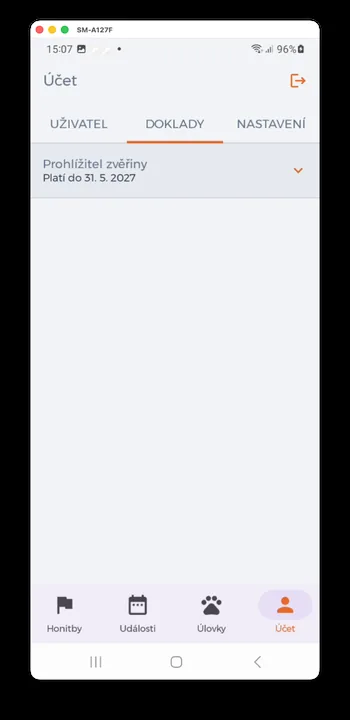
Make sure your account settings, in the “Documents” section, contain the correct identification details of the trained person:
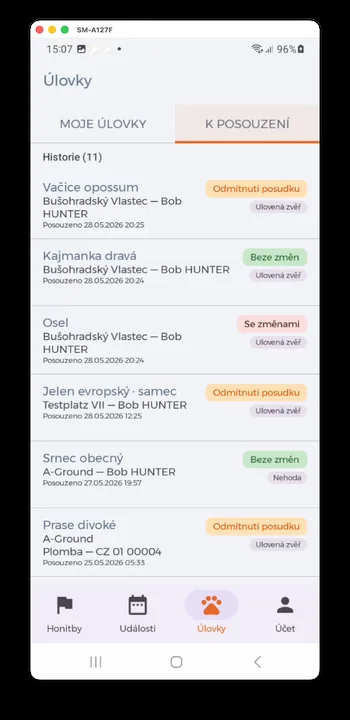
You will then find the list of catches awaiting assessment in the “Catches” tab, in the “For assessment” section:
Devo continuare a tenere le fascette su carta?
Le fascette stanno nell'app con numero, stato e detentore. Il responsabile le carica, le assegna ai membri e le ritira; una fascetta usata resta legata al suo capo. Altro nella pagina Registro dei capi.
L'app produce i moduli per l'amministrazione?
Prepara i moduli cechi Mysl 1, 2, 3, 4, 5, 7 e 8 dal registro che già tenete. Altri paesi hanno regole proprie. Altro nella pagina Registro dei capi.
Chi può approvare un piano di prelievo?
Discende dai ruoli della riserva. Il piano nasce come bozza, attende l'approvazione e viene poi approvato o respinto. Altro nella pagina Registro dei capi.
Posso registrare un capo senza segnale?
Sì. Le registrazioni fatte sul campo restano sul telefono e si sincronizzano appena torna il segnale. Altro nella pagina Registro dei capi.
Gli elenchi si possono esportare?
Ogni elenco si esporta in PDF: quello che consegnate all'amministrazione o ai membri sono gli stessi dati che già tenete. Altro nella pagina Registro dei capi.
Drone
How to connect my drone to HUNTERRA?
Ensure that the DJI drone remote controller is connected to the Internet. Then, in the DJI Pilot 2 app, select “Cloud services,” followed by “Open platforms.” Enter the URL
into the URL field and select “Connect.” You will be prompted to enter your login credentials. Use the username and password you chose during registration for the HUNTERRA app.
Upon successful login, a list of hunting grounds you have access to will be displayed. Select the one you are currently in and wish to save created points of interest and photos to. These created data will be visible on the map for other users.
A detailed guide can be found here.
How do I take a photo or mark a location with a drone so that others can see it?
Once your DJI controller is connected to the HUNTERRA app, every manually taken photo and marked location (pinpoint) will automatically be saved to the map of the hunting ground you selected during login from the controller. These created records are visible to all members connected to the selected hunting ground.
A detailed guide can be found here.
How do I create my own orthophotomap with a drone?
Make sure you are connected to the Internet on your DJI drone remote control. Then in the DJI Pilot 2 application, select “Cloud services”, then “Open platforms”. In the URL field, enter the address
and select “Connect”. You will be prompted to enter your login details. Use the login name and password you chose when registering for the HUNTERRA application.
After successful login, you will be shown a list of hunting grounds to which you have access. Select the one where you are currently located and where you wish to save the created points of interest and photos that we will create during the mission.
Plan an automatic mission (“Area route”) and start it. The photos taken will be automatically transferred to the HUNTERRA cloud, where a map will be automatically created from them. This map (or parts of it) can then be viewed in the HUNTERRA application – after setting the details at:
Before turning off the drone and controller, make sure that all photos have been transferred to the cloud, otherwise it will not be possible to create a map.
Why don't I see the points created by the drone on the map?
Check that you are connected to the Internet and logged in to the HUNTERRA cloud (detailed instructions can be found here).
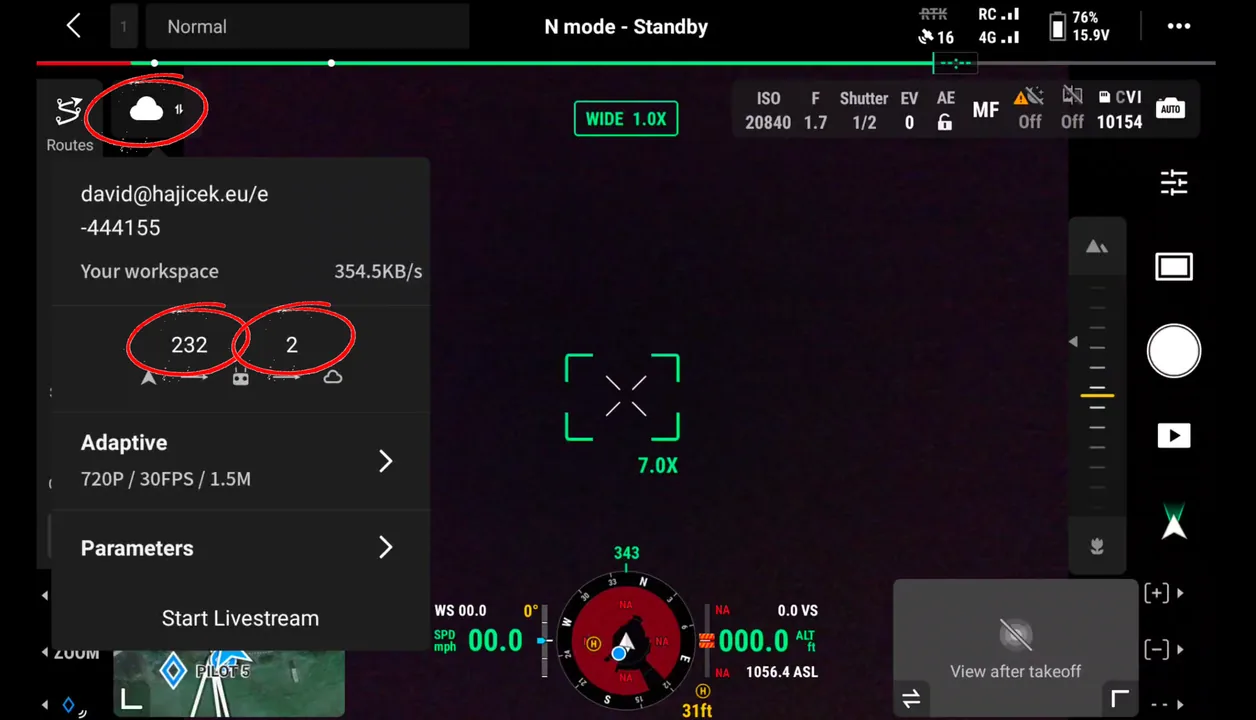
If the drone flies in an automatically set mission, the photos taken are automatically transferred to the cloud to be subsequently created as an orthophoto map. In automatic mode, it may happen that a large volume of transferred photos delays the transfer of points created manually. Therefore, make sure that the queue of transferred images is empty. If there is a number other than “0”, it is necessary to wait until all the images in the queue are transferred. The marked point will then appear on the map.
How to add points and photos to the map in HUNTERRA during automatic missions?
Make sure you have planned your mission as one of the “Patrol and Inspection Routes”, not as “Mapping routes”:
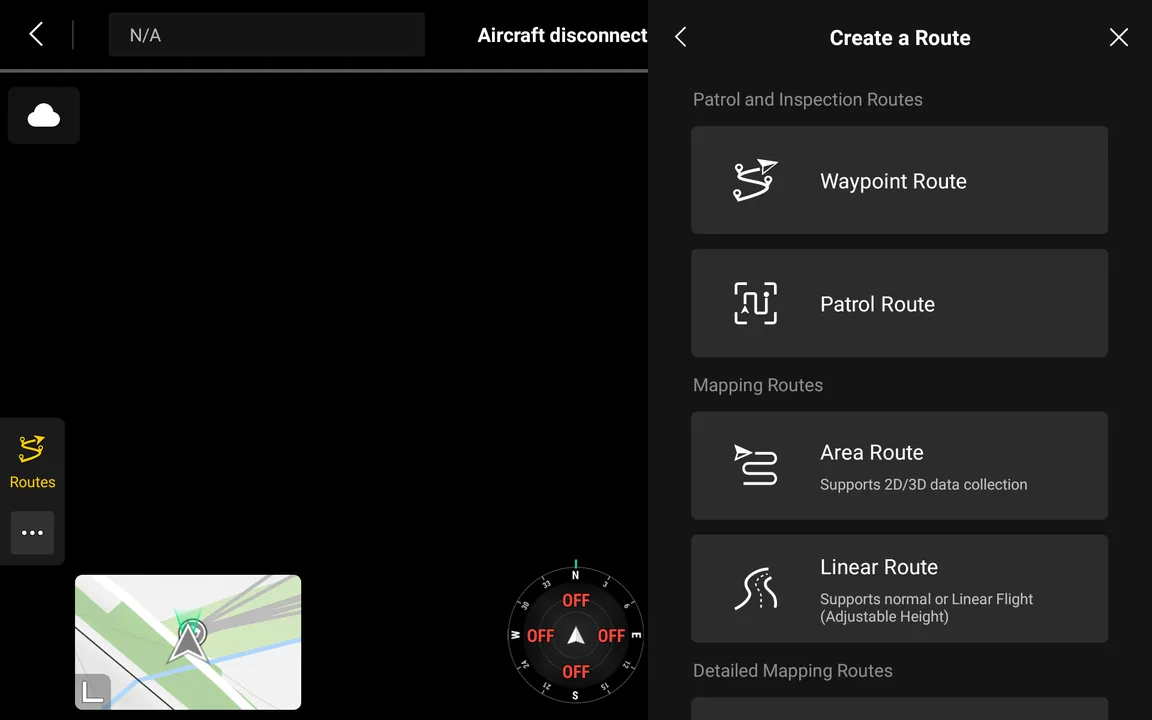
When selecting “Mapping routes”, the drone takes and automatically transfers images to the cloud for the purpose of creating a map. These images tend to be large in number and the large volume of data transferred overloads the communication line. Manually taken photos therefore wait in a queue before the automatically taken photos are transferred. DJI devices cannot distinguish between manually taken photos and prioritize their transfer.
Perché non vedo i punti con foto sulla mia mappa
- Il drone non ha la posizione — Senza segnale GNSS (GPS), eventualmente affinato dall'RTK, lo scatto non ha le coordinate e HUNTERRA non ha dove mettere il punto. Controllate sul radiocomando che il drone abbia la posizione e ripetete lo scatto.
- È in corso una missione di mappatura — Gli scatti di una missione di mappatura automatica vanno in elaborazione verso l'ortofoto e il modello 3D, non sulla mappa come singoli punti. In più sono molti: i dispositivi DJI non sanno dare priorità nel trasferimento alle foto fatte a mano, perciò restano in attesa finché non è caricato l'intero lotto. Finché la coda non segna zero, il punto sulla mappa non comparirà.
- State guardando un'altra riserva — Le foto e i punti vengono salvati nella riserva che avete scelto accedendo dal radiocomando. Controllate di avere aperta la stessa nell'app.
- Il collegamento con il cloud si è interrotto — Sul radiocomando uscite dal cloud HUNTERRA e rientrate. Così si ripristinano il collegamento e la scelta della riserva.
Fototrappole
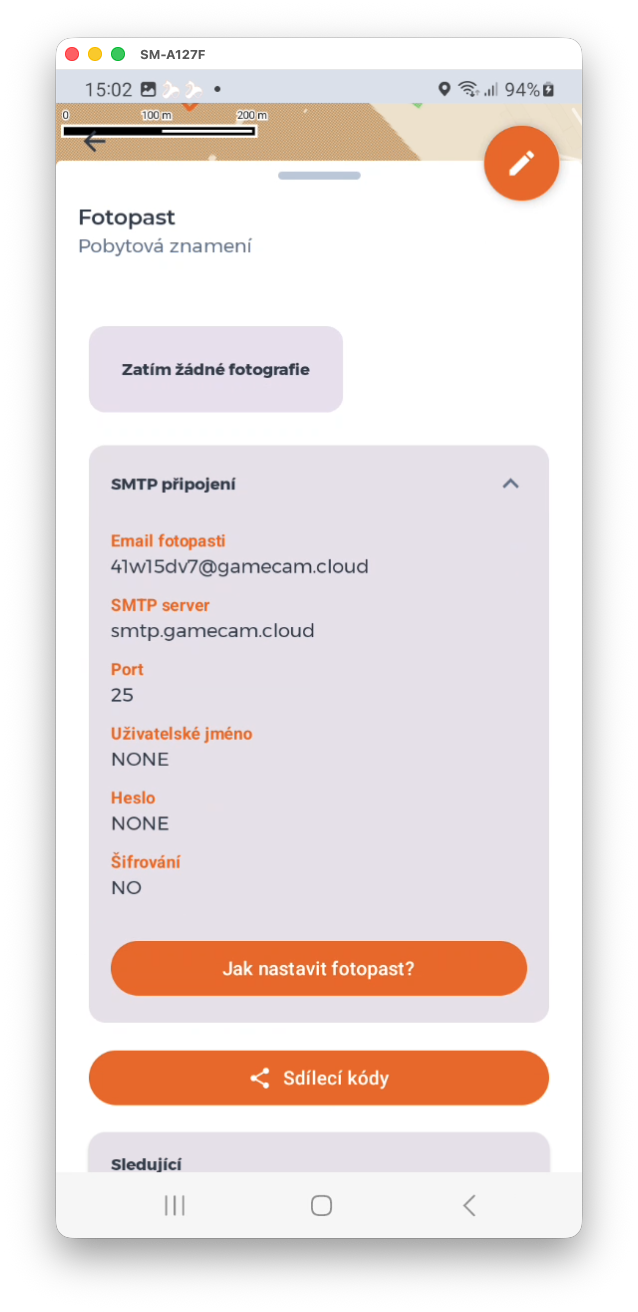
How do I connect a camera trap to HUNTERRA?
Make sure you have camera trap integration enabled in your account settings:
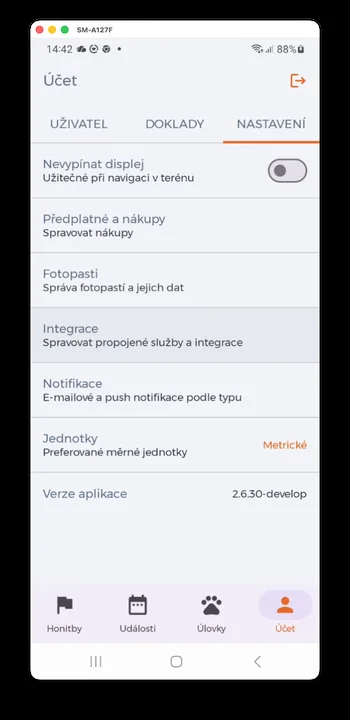
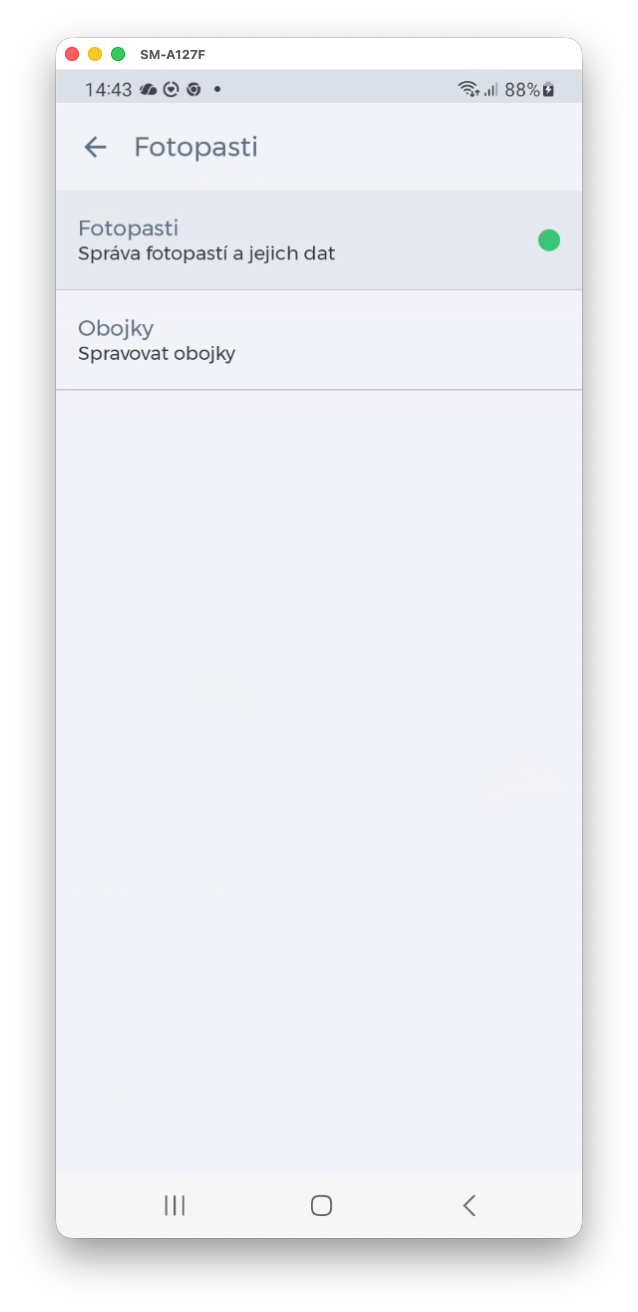
Then create a “Camera Trap” point of interest on the map and select “Create connection with camera trap”. Then just set the information displayed on your camera trap and the photos will start coming to your app in no time:
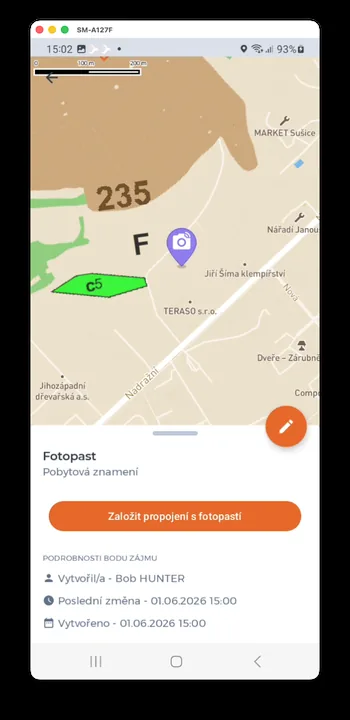
How to share photos from a camera trap with other users?
Photos from camera traps can be shared with other hunting ground users in two ways:
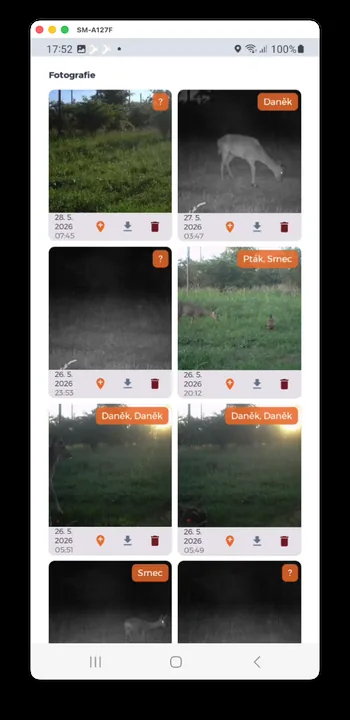
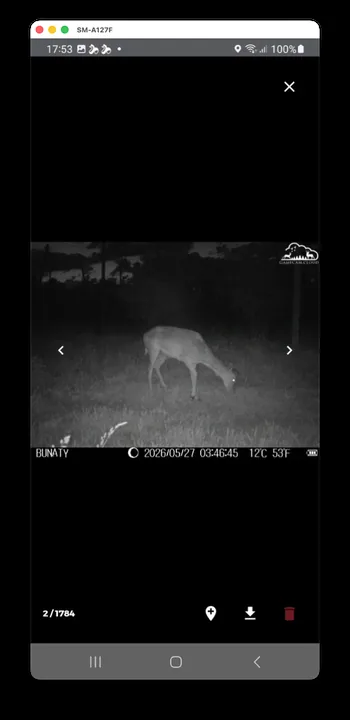
- You can share a specific photo from a camera trap with other hunting ground members by selecting the orange POI icon in the toolbar below the photo; the selected photo will automatically be added to the POI photos that all hunting ground members can see. The toolbar also contains buttons for downloading the photo to the gallery and deleting it:
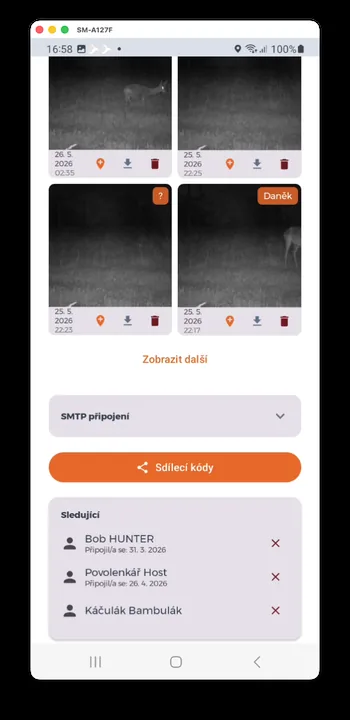
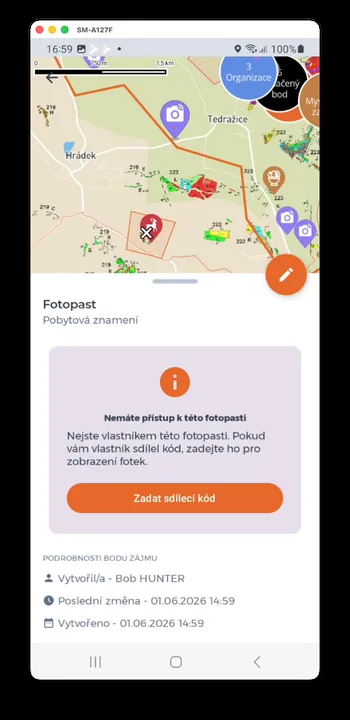
- You can share all photos from a camera trap with a specific hunting ground member by generating a sharing code that you provide to the user; the hunting ground member then enters this code in a specific POI of the photo trap type, which gives them access to the entire payload from the camera trap. You can share sharing codes and users (so-called followers):

Non hai trovato quello che cercavi?
Scrivici. Rispondiamo il prima possibile, di solito entro due giorni lavorativi.